November 26, 2013

easiest ever homemade birthday banner

Sunday was my baby's first birthday party.

To celebrate we drank hot cider, ate chili and cake, and had twenty six family members over to our house.


It really doesn't matter how big your house is, twenty six people filling it up will make it feel real small real fast. Seating becomes an issue, paper plates and plastic utensils become the best option, and decorations, I believe, are best kept at a minimum. I decided the only birthday decor would be banners, put up on the wall and out of the way.


I hung a store-bought "happy birthday" banner outside the house, but I wanted something simple and homemade for inside. I needed something that was easy, quick to make, and inexpensive.
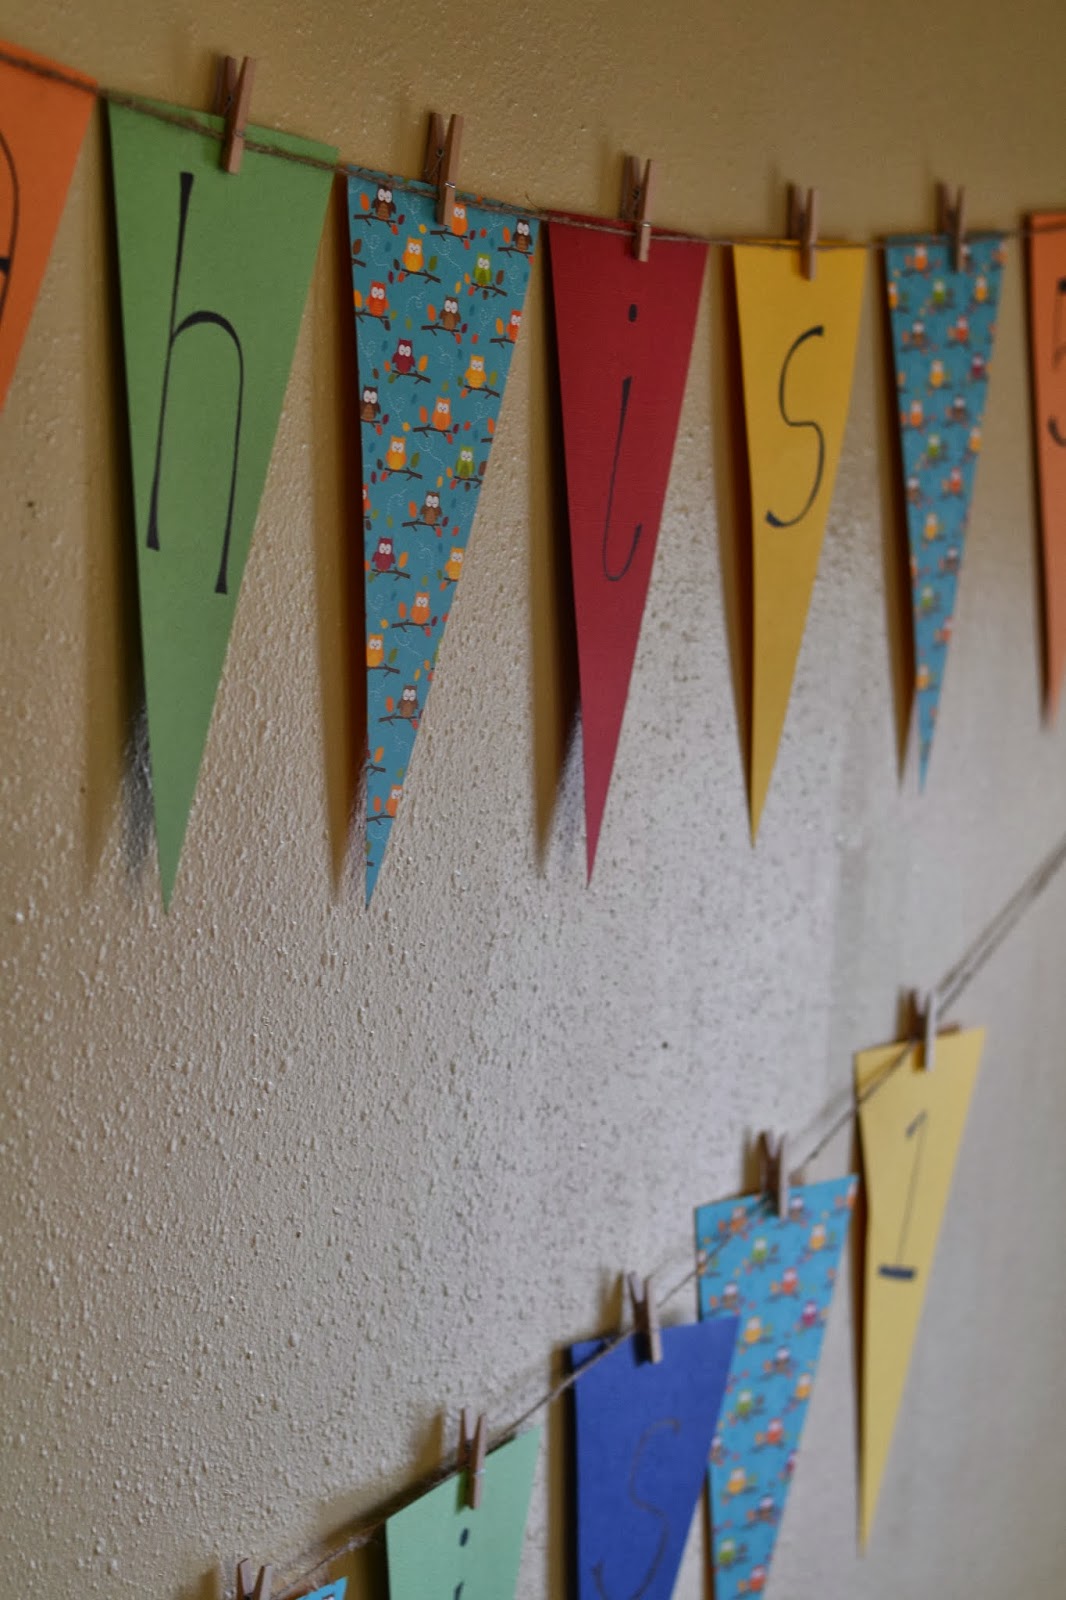

I went to the craft store with both kids, hastily picked out a couple pieces of scrap book paper with owls on them (they were colorful and sitting within quick reach at the end of an aisle), then collected ten sheets of plain paper with colors matching the owl pattern. I cut long triangles, put a letter on each one, and then hung them on twine with clothes pins, with the owl-patterned paper in between the words. I think it turned out awfully cheery.


In case you can't quite make out the lettering, the banners read: "Elijah is 5" and "Eleanor is 1".

This could be used for any quick shower, birthday, or holiday banner. How cute would one be hanging on the mantel for Christmas or New Years? There are so many scrapbook paper patterns out there, the possibilities are endless!


Happy crafting,
Ashley

November 21, 2013

my favorite gift to give + a pumpkin spice latte recipe

From Cup to Cup's 2013 Holiday Gift Guide: We believe that gift-giving should be done out of joy and excitement for the holiday season, and out of love for the recipient of our gifts, rather than the obligatory consumerism that so often plagues this time of year. It is our genuine hope that this guide will be helpful in finding just the right present to bestow upon the special people in your life. 


Coffee is kind of my best friend. 

Don't believe me? My wedding was coffee themed. My husband was a barista, and so was I for many years.

Still not convinced? My senior thesis in college was written on the health benefits of coffee. 

It is no wonder that my absolute favorite gift to give is that of coffee. I love bringing people lattes, making steaming mugs of the stuff when friends come over (particularly fellow moms), and gifting friends and family with the best invention known to, well.. to me: The AeroPress. 

The AeroPress works much like French press, only it is smaller and easier to clean, making it ideal for taking to the office, camping, or other travel.  Also, it results in a much smoother cup of coffee as compared to the French press and drip coffee due to the short duration of time that the coffee grounds are actually sitting in the hot water. The apparatus comes with 350 filters when first purchased which can be rinsed and reused (I use them each two or three times). If each filter is reused only once, that is still 700 cups of coffee you can enjoy before ever having to buy additional filters. There are also more permanent reusable filter options.

You can make a traditional cup of coffee by adding hot water to the AeroPress espresso shots, or you can create any variety of specialty coffee drinks, no fancy equipment needed.

How festive would it be to give the AeroPress with a bag of freshly roasted coffee, a fun mug, chocolate-covered espresso beans, or a homemade book of coffee drink recipes? Here is one to get you started:


Pumpkin Spice Latte

2 tablespoons pumpkin puree (not the pre-sweetened pumpkin pie filling)
1 tablespoon maple syrup or 2 teaspoons agave nectar (or more if you like sweeter drinks)
1/8 teaspoon (a hefty sprinkle) of both cinnamon and nutmeg (freshly grated nutmeg is best here)
Small sprinkle cloves
¾ cup milk of your choice
1 or 2 shots AeroPress espresso

Instructions: Put the pumpkin puree, sweetener of your choice, and spices into a mason jar. Add the espresso (you can extract the espresso right into the mason jar). Heat the milk until almost boiling (about 2 minutes on high in the microwave), and pour it into the jar. Secure the lid tightly and shake until the ingredients have combined and bubbly, thick foam has formed on top of the drink. Sprinkle additional spices on the foam if desired.

AeroPress operating instructions: grind the coffee beans of your choice to a fine grind (about 20 seconds in an average, hand-held grinder). Then insert a filter into the filter cap, screw it onto the chamber, and fill the chamber with grinds according to the amount of shots you want to make (a scoop is provided for easy measuring of 1 to 4 shots). Fill the chamber with hot water (165- 175 degrees Fahrenheit) to the number which corresponds to the amount of scoops/shots. Next, stir together the water and grounds and allow the mixture to sit for about 10 seconds. Then, insert the plunger into the chamber, and slowly plunge it down into the grounds and water mixture; this should take 20 to 30 seconds.  To clean, unscrew the cap and press the puck of grinds out into the trash can or compost. Rinse before pulling the plunger back through. Done.

Happy caffeinating,  
Ashley


Note: This entire post is my own opinion and in no way is it sponsored by Aeropress, nor do they know who I am, for that matter.

panini bar


A couple Saturdays past, we had a few friends over for dinner and games. This was not our typical dinner party, due to the fact that we had invited over a greater number of adults than children. In fact, the ratio of people over the age of twenty-seven to people age three and under was a whopping two-to-one. This was huge for us.

I was thrilled that I didn't have to work within the confines of "kid food that adults will also eat", but I did not want to be in the kitchen the entire day. I decided upon create-you-own grown-up grilled cheese: the panini bar.

The day of the get-together I was able to play with my kids all morning, go for a run/bike ride with the toddler, go grocery shopping, and prep dinner about twenty minutes before the guests showed up.


When they had all arrived and had beverage in hand, we distributed "order forms" on which they wrote what they would like us to fill their panini with (I had all the options written on a chalk board next to the table). One of our friends exclaimed "I didn't realize I was going to a restaurant for dinner!"


We (okay, the hubs) grilled the paninis up on our humongous counter top plug-in griddle, which we only pull out of storage for events such as this. (keep your oven on low and store the cooked paninis in there until they are all made so that you and all your guests can eat together. Otherwise, it's not really much of a dinner party.)


Right before everyone showed up I had (very quickly) cut out little tags and taped them to toothpicks so that guests could put their names on them and we would not lose track of which panini belonged to who (whom?) while we were cooking them. There are probably many ways to create a personal-panini-tracking system, but I threw this together fast and it worked just fine.


Dinner turned out great, and everyone raved about the meal (which they had picked out themselves, basically). I served it with a huge salad, but I think I would add a couple bowls of fun-flavored, crunchy kettle chips next time.

What do you think of this idea? Would you or have you done a panini bar for a dinner party? What options would you have added to our list? (I think cranberry sauce and artichoke hearts would also have been good... but not together.)

Happy entertaining,
Ashley

November 19, 2013

whole wheat pumpkin muffins made with greek yogurt and coconut oil


‘Tis the season, my friends.

The season for hot mugs of cider, big cozy sweaters, shuffling through fallen leaves, the smell of chimney smoke, and adding pumpkin to every conceivable recipe.

This time of year, it is difficult to ignore our pumpkin obsession. Search pinterest and you will find pumpkin fudge, pumpkin milkshakes, pumpkin risotto, pumpkin pudding, pumpkin scones, pumpkin adult beverages, pumpkin pasta sauce, pumpkin truffles, pumpkin pancakes, pumpkin cinnamon rolls... pumpkin everything.


Despite all the elaborate ways to use pumpkin, I am offering you a simple, easy recipe because it is just that good.

This recipe started as the King Arthur Flour Cookbook’s recipe for pumpkin bread. But I omitted the eggs and added some Greek yogurt. I took out the butter and threw in some coconut oil. I removed the white sugar and some of the brown and upped the spices. The result is a dense, rich, satisfying baked good with just the right amount of sweetness.


Pumpkin Muffins
makes 16-18 muffins

1/2 cup coconut oil
2 cups whole wheat flour
1 teaspoon baking soda
1/2 teaspoon baking powder
1/2 teaspoon salt 1 teaspoon cinnamon
1/2 teaspoon cloves
1/2 teaspoon freshly grated nutmeg (or ground if you do not have fresh)
3/4 cup brown sugar
1 heaping cup plain Greek yogurt (I used nonfat)
1 teaspoon vanilla
1 heaping cup canned pumpkin
Optional additions: 3/4 cup dried cranberries, chopped nuts, or chocolate chips (I vote chocolate chips, but that's just me)

 Preheat your oven to 375 degrees and line a muffin pan with liners or coat with cooking spray.

Melt coconut oil on the stove top in a small sauce pan over medium heat. Whisk the dry ingredients (flour through nutmeg) in a bowl.

In a separate bowl, whisk together the sugar, yogurt, vanilla, and pumpkin. Pour in the melted coconut oil and whisk well to combine. Add the dry ingredients and stir until combined well. Stir in any added ingredients, if using.

Spoon the batter to the top of the muffin liners and bake for 20-24 minutes, inserting a toothpick to ensure they are baked through. Cool on a wire rack for a few minutes before removing the muffins from the tin. Repeat with remaining batter.

Store in an airtight container for up to a week if they even last that long.

Enjoy!
Ashley


homemade chai concentrate

Between pregnancy and acid reflux that was causing me to lose my voice (no good when you're a singer and music teacher), I have spent a lot of time recently as a recovering caffeine addict. These days, a bit is not such a big deal, but a few months ago I found myself pining for chai. The spicy and sweet flavor is so comforting, but decaf chai lattes are almost impossible to find! The day I realized that homemade concentrate couldn't be too difficult to make, and that decaf black tea was my answer, my problems were solved-- at least the chai-related ones.


All you need are a few whole spices, black tea bags (decaf or regular depending on your preference), cheesecloth or a very fine mesh strainer, sweetener and a container. Considering a box of chai concentrate can run $6 in Vancouver, I would say this saves a lot of money, too! It's easy to customize, too: a little more or less sweet, more or less vanilla, orange zest for a kick... let your imagination run!


P.S. I have a pet peeve to confess. "Chai" means "tea", to to call it Chai Tea is redundant. Just a thought.


Chai Concentrate
makes enough for 5 lattes

4.5 cups water
10 bags black tea
2 cinnamon sticks
10 whole cloves
7 cardamom pods
2 whole star anise
1 inch fresh ginger, grated 
   OR 1/2 tsp ground ginger
pinch nutmeg
pinch black pepper
1/4 cup brown sugar
2 Tbsp honey
1 Tbsp vanilla extract

Bring water to a boil in a medium pot. Add tea and spices, cover, turn off heat and steep for 15 minutes. Pour over cheesecloth or fine mesh strainer, press liquid out of tea bags, and discard tea bags and spices. Stir in sugar, honey and vanilla until dissolved, allow to cool, and store in a jar or bottle in the refrigerator.

To make chai lattes, combine equal parts chai concentrate and milk of choice, and steam or heat on the stove or in the microwave. Enjoy!

cheers, Katie


November 18, 2013

the thankful tree: a kid craft + thanksgiving centerpiece


This is my favorite piece of Thanksgiving decor ever. I'm pretty sure I'm a genius for thinking of it, although someone else is bound to have already thought of it, or is going to... but whatever, I'm not googling it to find out... maybe I should get a copyright...

Anyway.

The Thankful Tree makes for an easy craft to entertain your kids for a few minutes, provides a fun and meaningful centerpiece on the table, and gives you a little keepsake from each year. Also, it is inexpensive to make and you don't have to store the whole thing in a box in your attic in between Thanksgivings.


To make the base, simply fill a large mason jar or a vase with rocks or pine cones, or a combination that you and your kiddos have collected. Next, find some large sticks with plenty of twigs to form the "tree." (Side note: While on a walk with the kids, I asked my neighbor if I could grab one of the branches he had cut from a tree he was trimming outside his house. He gave me the okay, but looked at me like I was crazy as I paraded down the street holding a large branch in the air.)

There are three ways we (James and I) have made the "leaves" of the tree:

Easy- Collect leaves (bonus: this gives you another outdoor activity). Have your kid(s) make the classic paper-over-leaf-rubbed-with-crayon leaf outline. (If you really don't know what I am referring to, click here- hint:step 6 is not necessary.) Then cut out around the leaf outlines.

Easier- Cut (or have your kids cut) leaf shapes out of paper (I used brown paper bags). Then let your kids paint the leaves fall-y colors.

Easiest- Last year I bought a couple sheets of Thanksgiving stationary and cut it into pieces. (In retrospect, I didn't even cut them into leaf shapes. Odd.)

Once the "leaves" are made, ask your kids what they are thankful for -this is my favorite part. You may need to give them some examples of things that you are thankful for (your kids, your spouse, your home, dark chocolate...). Then write what your kids say on the back of the "leaves".

I have kept the "leaves" from previous years, and I plan to continue to keep them each year so that I can remember what my kids have expressed gratitude for.


Last, attach the "leaves" to the "tree" with those adorable little mini-clothes pins. Done.

And there you have it: a fun craft, an outdoor adventure, quality time with the little ones, and a unique centerpiece that will be the talk of the table come Thanksgiving evening.
So much to be thankful for.

Happy crafting,
Ashley


November 03, 2013

checkin' in

Oh, Hi! Remember me? I am currently seated on the couch next to a passed-out little dude covered in layers of blankets with Tiggy and Mickey on his lap. Poor guy has the stomach flu. As in, the same illness that Elle was inflicted with only last week.

Thus, the blogging has been non-existent. However, there are exciting new projects brewing up in BlogWorld that I cannot wait to share with you. Hopefully I will have more news soon, but, until then, I will leave you with some photos taken by a guest photographer while at the Zoo, long before the Stomach Bug of 2013 came to live with us...


Our feet, and a clue as to who the mystery photographer could be...


The Zoo is already getting ready for Zoo Lights! (Note lights on tree above) I'm SO excited!


Eleanor's bum


He put a bird in this shot to try to make it artsy... what a little Portlander.


... if you haven't guessed yet, it's this guy:


... anyway, Happy Sunday everyone! Have a great week!


(Picture of  me with kiddos taken by my good friend, Elissa.)